
It has not been a long time since DevOps and Containers came into picture and it has already affected the decades old working style of people in the Tech industry. Now, with a rise in the demand of microservices, people concerned with development and deployment have to think in terms of containers.
But that isn’t much of a pain compared to the efforts that you have to put in to understand the concepts behind the orchestration of containers and their connection inside tools like Kubernetes and Openshift. I have really seen people struggling to get their microservices based applications live on a Kubernetes Cluster.
Wouldn’t it be nice if we could find a way to hide all the complexities that come with the integration of containers to our application?

This is exactly what we are going to learn in this article. After following all the steps mentioned in this article, you will be able connect your local VS Code Editor remotely to your Kubernetes cluster.
After completing this tutorial, whenever you make some changes to your code and click Save, it will directly get reflected in the live application running in the Kubernetes Cluster. Doesn’t it sound cool?
Prerequisites
- Admin Access to a Kubernetes Cluster on any cloud.
- Docker installed on Local PC.
- VS Code installed on Local PC.
Preparing the Kubernetes Cluster for Remote Connection (to be done by cluster admin)
In this section, we will install codewind operator and keycloak on our running kubernetes cluster. After that, we will create a keycloak user for our cluster and then we will assign a newly created codewind instance to that user.
The outcome of these steps will be a fully secure Access URL using which we can access our codewind instance remotely. All these steps will be performed by our Kubernetes Administrator only.
Installing Codewind Operator and Keycloak on cluster
- Log in to the Kubernetes cluster so that kubectl command is accessible.
- Clone the codewind operator repo in any worker node on your Kubernetes cluster.
$ git clone https://github.com/eclipse/codewind-operator -b 0.12.0 - cd into the deploy folder to find install.sh script. Running this script as shown below will install codewind operator and keycloak on our kubernetes cluster.
$ install.sh operator -i <ingress_domain> - Get the Keycloak access url
$ kubectl get keycloak -n codewind
Now you can paste this url in your local browser to access the KeyCloak dashboard. Use
admin as initial username and password.Creating a New User in Keycloak
- In the keycloak dashboard, Go to “Users” > “Add User”.
- Input required details about the user and click SAVE.
- Click on the Credentials button against the newly created user and input a password for the same.
Our Keycloak user has been created, we are going to use it to create our first codewind instance within our cluster.
Creating Codewind Instance for Keycloak User
- Go to the deploy folder again and run the following command using the username of the keycloak user that we created in previous step.
$ install.sh codewind -n <instanceName> -u <keycloakUsername> - Use kubectl to get the accessUrl of the newly created codewind instance.
$ kubectl get codewind -n codewind
This is the URL that we needed to configure our VS Code editor for remote connection as shown in next section.
Configuring VS Code for Remote Connection to Cluster (to be done by developer)
In this section, we will install the codewind extension for VS Code then using that extension we will securely connect to this codewind instance that we created in previous section.
We will also connect codewind extension to dockerhub so that all the images that we build in Cluster will be automatically sent to dockerhub.
After completing these steps, you will be able to either create a new project or transfer an existing local project directly to kubernetes cluster from your local VS Code Editor.
Installing Codewind Extension in VS Code
This part doesn’t require much elaboration as you need to just open the VS Code Editor and search for the Codewind extension and install it.
A new codewind section will appear in the left explorer pane. It will also install Appsody CLI and Codewind CLI as well by itself.
Connecting to Codewind Instance
- Click on the Cloud button next to the codewind section in your IDE.

- Input any name for this connection and hit Enter.
- In the Gatekeeper URL field, enter the Access URL of the codewind instance created by us in previous section. Also enter the username and password of the keycloak user that we created and hit Enter.

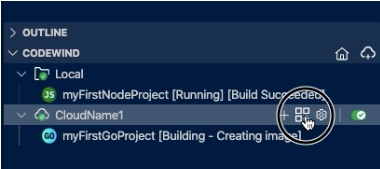
You will see the codewind section in your IDE will have two folders, one for the local environment and other for your kubernetes cluster in cloud.
Connecting to DockerHub
- Click on the gear icon next to cloud folder.

- Click on “Open Container Registry Manager” and then on “Add New”.

- Enter “docker.io” as registry’s base adderess and provide username and password for your dockerhub account. Namespace is usually same as your username.
You have now successfully connected VS Code to your Kubernetes cluster and dockerhub. You can use the + button to create a new project in your Kubernetes Cluster and Import button to transfer an existing project in your local PC to the Cluster.


No comments:
Post a Comment